
Australian Virtual Astronaut Challenge
Challenge 2
– Where We Live
NASA Shortfall: 1601 – Enable Observation of Whole Top-to-Bottom Dynamic Ecosystems
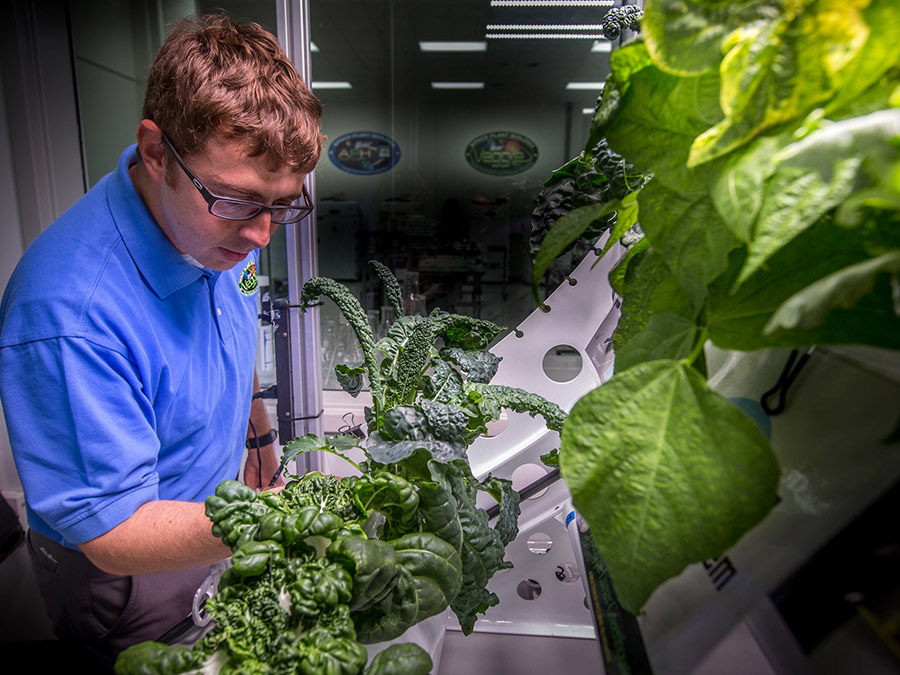
Human habitation off-world.
The ability to make tools and instruments and apply observational data can help us build and understand our human-made lunar ecosystem.

The Challenge: Operational Diagnostics for Lunar Life Support
The central difficulty is that in a confined lunar habitat, failure in one component (air, water, or food production) can rapidly trigger catastrophic failure across the entire system.
Your task is to move beyond theory and into practice. You must design and prototype a diagnostic sub-system that uses real-world data to secure the functionality of a lunar base.
Using tools such as an app, such as Arduino Science Journal (utilising your device’s internal sensors) or hardware like a Raspberry Pi, you will build a “Smart Monitor” that generates a real-time, continuous data flow.
Select one of the three Mission Pillars below. Your solution must use sensors to detect changes, log data, and propose how an automated system would react to that data to save the crew.
Mission Option 1: The Atmospheric & Water Recycling Loop
The Goal
Maintain the purity and balance of the life-support loop.
The Sensor Challenge
Design a system that monitors the efficiency of filters, scrubbers, or pumps.
- How to solve it
Use the microphone/decibel sensor to monitor pump “health” (detecting irregular vibrations or noises that indicate failure) or use light sensors to measure water turbidity (simulating contaminant detection). - Mission Critical Data
Your system must graph the data to show the exact moment a filter becomes clogged or a pump begins to fail, triggering an alert.
Mission Option 2: The Regolith Mining & Processing Monitor
The Goal
Monitor the top-to-bottom process of turning lunar soil into usable materials.
The Sensor Challenge
Create a diagnostic tool for the heavy machinery or chemical reactors used in processing.
- How to solve it
Use accelerometers (X, Y, Z) to measure the stability of the mining equipment, or temperature sensors to ensure chemical reactors do not overheat. - Mission Critical Data
You must demonstrate how your device differentiates between “normal operation” vibrations/temperatures and “critical failure” readings.
Mission Option 3: Radiation & Health Shielding Map
The Goal
Dynamically map invisible threats to crew health.
The Sensor Challenge
Design a mobile sensing unit that tracks cumulative exposure to environmental hazards.
- How to solve it
Use magnetometers to map magnetic field anomalies (simulating radiation leaks) or lux/light sensors to test the integrity of blackout shielding materials. - Mission Critical Data
Create a “heat map” of your environment using your sensor data to identify safe zones vs. danger zones, triggering automated countermeasures (like deploying active shielding).
Your Mission
Propose a component for a lunar base that is actively monitored and manages its status and that of the base using data, which is essential for long-term off-world habitation.
You are not just delivering a blueprint; you are delivering proof of observation.
- Build/Simulate
Create a physical representation or model of your chosen component. - Sense
Attach your sensor device. - Analyse
Run the system and induce a “failure”. - Report
Present the data visualisation that proves your system successfully observed the dynamic change in the ecosystem.

Mission 1 – Define
Define
The define stage of the iSTEM engineering design process requires students to think carefully about, what is the problem they are going to solve?, who are they solving the problem for, and why does the problem need to be solved?
An integral part of the iSTEM process is the definition of a meaningful and actionable, mission statement. Students will work through a variety of activities in order to to produce a quality mission statement that will guide their team’s work and kickstart the ideation process.
Use the lessons below to commence defining your mission.
Define – Suggested Learning Sequence
– Where We Live
Our expert curriculum designers have developed a suggested week 2 learning sequence for teachers. The following is for the full set of AVA resources, however, teachers are encouraged to only use activities which are most suitable for their own class and school setting.
Sub Mission 1: Setting the Scene Watch the introductory video featuring Ted Tagami (Magnitide.io) and Nick De Leon (Royal College of Art London) who will discuss the importance of design thinking in space.
Sub Mission 2: Mission Statement Provide students with the Mission Statement worksheet, discuss what makes a good mission statement and how to produce one.
Sub Mission 3: Space Force Show the U.S. Space Force promotional video and get students to discuss what they think the Mission Statement might be for Space Force.
Sub Mission 4: Analysing the Problem Provide copies of the Analysing the problem worksheet to each team and get students to complete tasks.
Sub Mission 5: Brainstorming Get students to watch the brainstorming video and get students to use one of the two different brainstorming methods described in the worksheet to come up with possible problems to solve.
Sub Mission 6: Synthesise your Ideas Download worksheets and provide them to each team. Get teams to select the best four ideas from their brainstorming exercises and evaluate each using pros and cons. Teams select and justify their final selection.
Sub Mission 7: Empathy Mapping Get students to watch How to Empathy Map video. Provide each team with the empathy mapping worksheet and get them to complete the exercise.
Sub Mission 8: Write a Mission Statement Provide students with the mission statement worksheet. In teams get students to write their own mission statement based of their brainstorming and empathy mapping.
Sub Mission 9: Scenarios Get students to watch the selected videos from their selected scenario to provide additional context for their project.
Define – Downloadable Resources
– Where We Live

Mission Statements
The following provides information on the ‘Define’ stage of the iSTEM engineering design process. Students learn about what makes a good mission statement and how to produce one. The mission statement will help guide students work throughout the design process.

Analysing the Problem Worksheet
This worksheet has been designed for student to analyse the AVA scenario. They will document their deliverables and the who, what and why of the mission. It is important that students clearly understand the scenario.

Brainstorming
In this worksheet students learn about brainstorming. Students undertake a task where they chose from 2 different methods of ideation. They are asked to come up with ideas about different problems they might like to solve as part of AVA.

Synthesize
Students are asked to synthesize their ideas from the brainstorming session from the previous task. Using this worksheet students select four of the best problems and evaluate them before making a decision on which would be the best problem to solve.
Empathy Mapping
An empathy map is a simple, easy-to-digest visual that captures knowledge about a user’s behaviors and attitudes. In this worksheet students learn about empathy mapping and complete an empathy mapping task in which they complete research and observations of the end users of their designs.
Mission Statement Worksheet
Students should have completed a range of activities to better understand the who, what and why of their scenario and select a problem to solve. In this worksheet they are to produce a mission statement which clearly describes the problem that they are trying to solve.

Define
This downloadable PDF is a full collation of the all the ‘Define’ worksheets. This has been uploaded for help save teachers time. The individual document downloads allow for teachers to only select those resources which are most suitable for their class.
Download Collate Define PDF >>>
Website Resources
iSTEM Process Poster
Download Word Doc >>>
iSTEM Process Guide
Download PDF >>>
Empathy Mapping
https://www.nngroup.com/articles/empathy-mapping/
Understanding the Job Video
Clayton Christensen, professor at Harvard Business School talks about the job to be done – through milkshakes!
https://www.youtube.com/watch?v=sfGtw2C95Ms&t=58s
How Miscommunication happens Ted Ed Talk
https://www.youtube.com/watch?v=gCfzeONu3Mo
Define – Video Resources
– Where We Live
General background information for teachers and students to support challenge activities.
Brainstorming – NSW Virtual STEM Academy
Ian Preston, Deputy Principal from the NSW Virtual STEM Academy at Murriumbidgee Regional High School discusses the concept of brainstorming. This video provides context for the week 2 AVA brainstorming worksheet and discusses how to brainstorm effectively. (04:09 minutes)
How to Empathy Map
A 5-step process for creating empathy maps that describe user characteristics at the start of a design process. (02:51 minutes)
Mission 2 – Identify
What is ‘Identify’
The identify stage of the iSTEM engineering design process requires students to determine the constraints of their project. When do I need to have the project completed? What does it need to do? What are the costs factors? What materials, tools and equipment required? In this stage students typically start project management, so they are able to complete the project on time and on budget.
Key Questions for Students to consider
- What are the constraints of the problem you are trying to solve?
- What other solutions are people using and how will that affect their ability to use your solution?
- How much will it cost and what is the overall budget?
- What skills and knowledge does the team possess?
- How much time do I have for completion?
- What tools and equipment are required and available?
- What data or information will be needed
Possible Activities
- Clearly identify all relevant constraints.
- Identify constraints of the end user.
- Produce a budget or finance plan.
- Identify start and finish dates and any milestones for the project.
- Develop a resource list, including tools, materials, and people.
- Identify data and information that needs to be collected
Suggested Learning Sequence – Identify
Our expert curriculum designers have developed a suggested Mission 3 learning sequence for teachers. The following is for the full set of AVA resources, however, teachers are encouraged to only use activities that are most suitable for their own class and school setting.
Sub Mission 1: Setting the Scene Watch the introductory video for mission 3 presented by Ben Newsome.
Sub Mission 2: Constraints Video We also suggest that students watch the introductory video for featuring Ted Tagami and Nick De Leon. This time take particular note of the conversations regarding constraints.
Sub Mission 3: Constraints Provide students with, What is a Constraint worksheet, discuss constraints and the work presented in the Nick De Leon and Ted Tagami video. Also, watch the power of creative constraints Ted Talk video.
Sub Mission 4: Mindmap Students use the mind map worksheet to brainstorm constraints for their projects.
Sub Mission 5: Identify Constraints Students to use this worksheet to clearly identify their project constraints. Students to use the results of their mind-mapping exercise. Students also develop different criteria to evaluate the success of their final project.
Sub Mission 6: Materials, Tools and Equipment Provide students with the materials, tools and equipment worksheet where they complete the two activities. Students identify the materials that they may require as well as any tools and equipment that will be essential.
Sub Mission 7: Project Management and Teamwork Students watch the AVA2021 video featuring Allan Ryan from the Hargraves Institute. Provide students with the worksheet to support the two challenges. Students complete the 30-second and 2-minute challenge as described in the video and worksheet.
Sub Mission 8: Project Management Software Students research Trello and other project management software to determine if it is suitable to use for their projects.
Sub Mission 9: Project Management Exercises Provide students with Project Management Worksheet.
Sub Mission 10: Gantt Chart Students to create a basic Gantt chart using the worksheet. Students can create using an excel spreadsheet as an extension exercise. Students to complete a basic action plan.
Sub Mission 11: Scenarios Get students to watch the selected videos from their selected scenario to provide additional context for their project.
Identify – Downloadable Resources
– Where We Live

What is a Constraint?
This worksheet describes the work of Nick De Leon from the Royal College of Art UK. It supports the video and provides a written record of the his discussions on Constraints.

Mind Map
In this worksheet, students complete a Mindmap to brainstorm as many different constraints that they may have on their projects. Students should consider their mission brief from Mission 2.

Constraints
In this worksheet, students determine their final constraints based on the mind mapping exercise they completed on the previous worksheet. Students also develop criteria to evaluate success.

Materials, Tools and Equipment
In this worksheet students are asked to identify any materials, tools or equipment that they may require in order to solve the problem.

Project Management and Teamwork
In this worksheet students are introduced to the video featuring Allan Ryan from the Hargraves Institute. It involves students completing two design exercises.

Gantt Chart
In this worksheet, students are to create their own basic Gantt chart. Students are also asked to complete an action plan to assist them in planning their projects.

Identify
This downloadable PDF is a full collation of all the ‘Identify’ worksheets. This has been uploaded to help save teachers’ time.
Identify – Video Resources
– Where We Live
General background information for teachers and students to support challenge activities.
Constraints in Design Thinking
Ted Tagami CEO of Magnitude.io talks with Dr Nick De Leon from the Royal College of Art in the United Kingdom discuss the need for constraints in the design thinking process. (9:23 minutes)
Project Management Team
This AVA 2021 video features Allan Ryan from the Hargraves Institute. Allan discusses what makes a good project management team and outlines some tips about project management. (9:09 minutes)
The Power of Creative Constraints
There are constraints in any project. These constraints can cover everything from the cost of resources, how quickly can you get those resources, how many people you have and much more. In this TED-ED video, Brandon Rodriguez explains how creative constraints actually help drive discovery and innovation. (4:51 minutes)
Mission 3 – Brainstorm
What is “Brainstorm”?
This stage of the iSTEM engineering design process requires students to collaboratively pull together ideas that might solve the problem. The goal is to produce large quantities of ideas in a short amount of time.
Key Questions for Students to consider
- How are you going to generate ideas?
- What information will you use to generate ideas?
- What strategies can you use to develop the most innovative ideas from your team?
- How can we make sure that all ideas are valued when working in a team?
- What makes this project innovative?
- What is the best way to communicate your ideas?
- How can you make the idea generation session inclusive
Possible Activities
- Use divergent thinking to produce as many creative ideas as possible.
- Utilise a range of idea generation techniques.
- Explore existing solutions to create new design ideas.
- Investigate potential technologies and techniques that could be used in the solution.
- Produce thumbnail sketches and annotated drawings of initial ideas.
- Communicate and share ideas.
Suggested Learning Sequence – Brainstorm
Our expert curriculum designers have developed a suggested Mission 4 learning sequence for teachers. The following is for the full set of AVA resources, however, teachers are encouraged to only use activities that are most suitable for their own class and school setting.
Sub Mission 1: Setting the Scene Watch the introductory video for mission 4, that includes Nick De Leon.
Sub Mission 2: Sketching Your Ideas Learn how to sketch your ideas in 3D using the video from Glenny-D. Students to use the associated worksheet to practice their drawing skills.
Sub Mission 3: Sketching Provide students with the brainstorming sketching worksheet and get students to practice drawing thumbnail sketches. Note you could use this after Mission 4 or 5 or as part of that exercise.
Alternative Mission 4: Ideas Blitz Watch video by Ian Preston and Wendy Bode on how to do an ideas blitz. Provide students with the ideas blitz worksheets and get students to work through the exercises. Note you could get students one, some or all of the steps.
Alternative Mission 4: Crazy 8’s In the introductory video by Nick De Leon he discusses the Crazy 8’s design thinking exercise. As an alternative to the ideas blitz, you could get your students to use this ideation technique. Provide students with the Crazy 8’s worksheet and get students to work through the exercises.
Brainstorm – Downloadable Resources
– Where We Live

Brainstorm – Sketch Your Ideas in 3D
This worksheet is to be used in conjunction with the Glenny-D video from Splat 3D. This worksheet has a template of shape to assist students to learn how to draw in 3D using basic shapes.
Brainstorm – Sketching Worksheet
This sketching worksheet is to be used after students have completed the previous drawing exercise with Glenny-D. Students are to practice producing annotated sketches of their ideas.
Brainstorm – Ideas Blitz
Students use the Ideas Blitz method developed by Dr Ken Hudson. It is a short, fast, semi-structured and productive tool to help students to come up with ideas. There are 5 potential steps for the ideas blitz.
Brainstorm – Crazy 8’s
This worksheet accompanies our week 4 introductory video featuring Nick De Leon from the Royal Art College in the UK. Nick discusses the use of the Crazy 8’s brainstorming activity originally developed by Google.
Brainstorm – Video Resources
– Where We Live
General background information for teachers and students to support challenge activities.
Brainstorm – Sketching Your Ideas in 3D
In this video Glenny-D from Splat 3D takes you on a journey to discover the 3 keys for drawing in 3D. After watching this video students will be able to produce basic design sketches to help with the brainstorming process. (16:19 minutes)
Brainstorm – Ideas Blitz Instructions
Presented by Ian Preston Deputy Principal – NSW Virtual STEM Academy and Wendy Bode Deputy Principal – Queensland Virtual STEM Academy QLD Virtual STEM Academy (08:33 minutes)
Mission 4 – Design
What is “Design”?
This stage of the iSTEM engineering design process requires students to design & refine ideas in readiness for their first prototype. How do the ideas fit together? Which is the best design to trial? Are all resources available?
Key Questions for Students to consider
- Is the design concept a product, environment, system, or something else?
- What kind of subject matter experts can you bring on to help you design the best solution?
- How do we combine many ideas into design solutions?
- How do you resolve conflicting design ideas?
- How do you choose the best design?
- Do you have the skills required to produce the design solution
Possible Activities
- Use convergent thinking to develop ideas and refine solutions.
- Work collaboratively to enhance solutions.
- Produce sketches, detail drawings, digital graphics to communicate solutions.
- Use critical thinking, problem-solving, and entrepreneurial activities to produce the ‘best solution’.
- Use a range of design tools to communicate ideas.
Suggested Learning Sequence – Design
Our expert curriculum designers have developed a suggested Mission 5 learning sequence for teachers. The following is for the full set of AVA resources, however, teachers are encouraged to only use activities that are most suitable for their own class and school setting.
Sub Mission 1: Setting the Scene Watch the introductory video for mission 5, which includes Nick De Leon and Ted Tagami.
Sub Mission 2: Design Thinking Activity Provide students with the design thinking worksheet and get students to complete the 2-minute design challenges as described by Nick De Leon in the opening video.
Sub Mission 3: Divergent and Convergent Thinking Watch video from Anne Manning to learn how to complete the divergent and convergent thinking exercises. Provide students with the design ideas worksheet, and get them to complete a series of exercises taking their best six design ideas and synthesizing them down to one final design solution.
Sub Mission 4: Observational Drawing Watch the Imaginaturalists video from Gillian Hewitt. Provide students with worksheet and complete drawing exercises. As an extension, teachers may wish to complete the herbarium sheet activity. Although this work is applicable to all scenarios it is particularly relevant to Home on the Moon and Growing plants in space.
Sub Mission 5: Design Drawing Watch the fundamentals of drawing for design video by Glenny-D, which covers the three keys for learning to draw your ideas in 3D. Provide students Design Drawing worksheet and get students to produce some design drawings of their final idea.
Extension Mission 6: Computer-Aided Design Watch Using CAD in Design video, where Mr Ian Preston discusses how to use CAD in design. Provide students with worksheet and discuss Computer-Aided Design. Get students to complete CAD design challenge.
Design – Downloadable Resources
– Where We Live

Design Thinking
In this worksheet, students complete a 2 minute design thinking exercise as described by Nick de Leon in the opening video. It is designed to be a fun activity to get students to think about for whom they are designing.

Design Ideas
In this worksheet, students learn about divergent and convergent thinking. Students complete a series of exercises taking their best six design ideas and synthesizing them down to one final design solution.

Design – Imaginaturalists
These worksheets have been designed to get students to use the power of observation and communicate information through drawing. Also has a how to prepare hebarium sheets activity. Best used for scenario 3 and 4.
Design Drawing
In this worksheet students use the techniques described by Glenny-D to draw detailed drawings for the purpose of producing a prototype.

Design Drawing – Examples
This is a supplementary worksheet for the Glenny-D design drawing activities. In this worksheet is some sample work completed by Glenny-D in his video.

Computer Aided Design
This worksheet is to support the Tinker-CAD video presented by Mr Ian Preston. It has related information about CAD packages and a CAD based design challenge.
SOLIDWORKS® School Sponsorship
Use the free SOLIDWORKS® Software on your browser to create your designs.
Design – Video Resources
– Where We Live
General background information for teachers and students to support challenge activities.
Convergent vs Divergent Thinking
Anne Manning from Harvard Professional Development demonstrates exercises for divergent and convergent thinking. (3:38 min)
Fundamentals of drawing for design
Glenn Lawrence from Design Nuts covers using fine lines and simple shapes as building blocks for design (16:19 min)
Observational drawing
Gillian Hewitt from Imaginaturalists discusses how to use observation of fine detail when drawing (13:55 min)
Using CAD in design
Ian Preston, Deputy Principal of the NSW Virtual STEM Academy discusses how to use CAD in design (14:46 min)
Mission 5 – Prototype
What is a “Prototype”?
This stage of the iSTEM engineering design process requires students to create the first model of their solution. Is it safe? Do you have the resources? How can you get feedback on the design?
Key Questions for Students to consider
- What type of prototype are you going to construct, a product, device, video, or computer model?
- What fidelity will you prototype at?
- What can you create to get the most feedback with the least investment in order to iterate quickly?
- Have you considered work, health and safety (WHS)?
- Are resources available to produce the model or prototype?
Possible Activities
- Use appropriate tools and materials to produce models or prototypes.
- Utilise computer-aided manufacturing (CAM) to produce rapid prototyped models.
- Produce minimal viable products that demonstrate the aesthetic, functional and ergonomic attributes.
- Apply coding techniques to create solutions using physical computing or robotics technologies
Suggested Learning Sequence – Prototype
Our expert curriculum designers have developed a suggested Mission 6 learning sequence for teachers. The following is for the full set of AVA resources; however, teachers are encouraged to only use activities that are most suitable for their own class and school setting.
Sub Mission 1: Setting the Scene Watch the introductory video for Mission 6, which includes Nick De Leon and Ted Tagami.
Sub Mission 2: Prototype Provide students with the prototype worksheet and explain the different types of prototypes.
Sub Mission 3: Testing Provide students with prototype – testing worksheet. Get students to relist the original criteria to assess the success of the project in the space provided on the worksheet. Watch the evaluation video by Glenny-D which demonstrates how to go about testing a prototype. Provide opportunities for students to test and improve their prototypes.
Sub Mission 4: Documentation Provide students with prototype – documentation worksheet. Get students to outline the step in the construction of their prototype in the spaces provided on the worksheet. Get students to attach photographs or possibly a link to a video or the final prototype design.
Optional Mission 5: Geodesic Dome Provide students with the how to make a geodesic dome worksheet. Get the students to construct a model geodesic dome using the instructions provided.
Optional Mission 6: Make a Paper Mars Helicopter Direct students to the NASA JPL website. Get the students to follow the instructions including watching the instructional videos.
Protoype – Downloadable Resources
– Where We Live
Prototype – Introduction
This worksheet introduces the concept of Prototyping. It provides background on different types of prototypes and constructing a prototype.
Prototype – Testing
In this worksheet, students are introduced to testing their prototyped solutions. The criteria for success is reintroduced as a way to evaluate the prototype.
Prototype – Documentation
This worksheet should be used to document the the step in construction of the prototype and too communicate your solution.
Prototype – Build a Geodesic Dome
In this worksheet, students are stepped through the process of building a cardboard geodesic dome. This is an extension activity for students to develop skills in producing models.
Prototype – Video Resources
– Where We Live
General background information for teachers and students to support challenge activities.
Design drawing and prototyping
Glenn Lawrence from Design Nuts describes prototyping a geodesic dome & challenges us to draw a prototype in 2 minutes using design drawing (10:16 min).
Rapid prototyping
Tom Wujec talks about the benefits of physical representations of your ideas through rapid prototyping (2:37 min).
Mission 6 – Evaluate
What is “Evaluate”?
This stage of the iSTEM engineering design process requires students to determine the effectiveness of their first design solution. What worked? What did not? Are there better ways to address the problem?
Key Questions for Students to consider
- What is your evaluation criteria?
- What revisions or improvements can be made to the design?
- How innovative is the solution?
- Has the solution produced any unintended outcomes?
- Can your design choices be justified?
- What was discovered from the testing and experimentation of the solution?
- Is there more experimentation and testing required?
- How well did the solution meet the success criteria
Possible Activities
- Complete testing and experimentation.
- Analyse and evaluate the impact of the solution on the environment and society.
- Complete evaluations and feedback to establish if the solution meets the design brief.
- Collect, organise, and interpret data to inform and evaluate design decisions.
- Use peer evaluation and self-reflection to identify any improvements
Suggested Learning Sequence – Evaluate
Our expert curriculum designers have developed a suggested Mission 7 learning sequence for teachers. The following is for the full set of AVA resources, however, teachers are encouraged to only use activities that are most suitable for their own class and school setting.
Sub Mission 1: Setting the Scene Watch the introductory video for Mission 7, which includes Nick De Leon and Ted Tagami.
Sub Mission 2: Experiment Provide students with this worksheet and get them to devise an experiment that will test one of the criteria for success that was set at the beginning of the design process.
Sub Mission 3: SWOT Provide students with SWOT analysis worksheet and get them to complete the analysis for their prototype design.
Sub Mission 4: Evaluation – Criteria Provide students with this worksheet. Get students to evaluate the prototype against the success criteria that were established at the beginning of the design process.
Sub Mission 5: Evaluation – Perspectives Provide students with a Perspectives worksheet. Get students to complete this modified PMI evaluation from different stakeholder perspectives.
Evaluate – Downloadable Resources
– Where We Live

Evaluate – Experiment
In this worksheet students devise an experiment for their prototype and then evaluate it against a criteria for success.

Evaluate – SWOT
In this worksheet students are invited to complete a SWOT analyses of their prototype design solutions.

Evaluate – Criteria
In this worksheet students evaluate their prototype against the criteria for success, established at the start.

Evaluate – Perspectives
In this worksheet students evaluate their prototype using a modified PMI which is completed from different stakeholder perspectives.
Evaluate – Video Resources
– Where We Live
General background information for teachers and students to support challenge activities.
Keira Chrystal – Macquarie University
Keira Chrystal from Macquarie Orbital talks with Ted Tagami about collaboration, learning from failure and the work at Macquarie Orbital. Keira’s team is working on a biological payload that uses 3D printed technologies on cubesats. (07:15 min).
Orion Evacuation Evaluation
How well astronauts and ground crew can get out of the Orion spacecraft during in an emergency on the launch pad is critical. Evaluation was completed at NASA/Johnson Space Center’s Space Vehicle Mockup Facility (2:03 min).
Mission 7 – Iterate
What is “Iterate”?
This stage of the iSTEM engineering design process requires students to continuously improve their design. Which changes will produce a better result? Can you improve the design’s functionality? Are the more ideas that can be incorporated into the design?
Key Questions for Students to consider
- Do we need to revisit earlier phases of the process?
- Has the identified problem or need changed?
- Has the solution produced other opportunities?
- How can the solution be further improved?
- If you decide to make revisions, what will it look like?
- Are there plans and enough resources to make revisions
Possible Activities
- Assess previous iterations of the design solution.
- Repeat, design, prototype and evaluate, until the ‘best possible solution’ is achieved.
- Refine design ideas based on results of experimentation, testing and evaluation.
- Produce a minimal viable product (MVP) after numerous iterations of the design solution.
Suggested Learning Sequence – Iterate
Our expert curriculum designers have developed a suggested Mission 8 learning sequence for teachers. The following is for the full set of AVA resources; however, teachers are encouraged to only use activities that are most suitable for their own class and school setting.
Sub Mission 1: Setting the Scene Watch the introductory video from Ben Newsome. Also watch the Core Electronics video that shows an example design process that uses the iSTEM process.
Sub Mission 2: Iterate Provide students with this worksheet and get them to sketch and annotate four different improvements or iterations of their previous design solution.
Sub Mission 3: Iterate Drawing Provide students with this worksheet and ask them to draw a new iteration of their design solution combining some of their ideas from the previous exercise. Get students to annotate their drawings to provide descriptions of the improvements.
Sub Mission 4: More Drawings Provide students with these worksheets and ask them to produce a series of drawings of their newly iterated design. Get students to produce a top and side view orthographic drawing, a pictorial drawing and an isometric drawing using the iso grid. Students should annotate their drawings.
Sub Mission 5: Final Design Provide students with this worksheet. Ask students to complete the final annotated drawing of their design solution.
Sub Mission 6: Scenarios Get students to watch the selected videos from their selected scenario to provide additional context for their project.
Iterate – Downloadable Resources
– Where We Live
Iterate – Improvements
In this worksheet students sketch and explain four possible improvement to their original design. Students to annotate sketches to describe improvements.
Iterate – Drawing
In this worksheet students sketch a second iteration of their design solution. Students should integrate some of the design ideas from the previous sheet.

Iterate – Ortho, Pictorial, Iso Drawing
In these worksheets students are to produce a range of drawing including Orthographic, Pictorial and Isometric projections of the new design iteration.

Iterate – Final Drawing
In this worksheet students are to communicate their final iterated design concept. Use the sheet to show the details of the design with annotations.
Iterate – Video Resources
– Where We Live
General background information for teachers and students to support challenge activities.
Iteration using a LEGO car
Step by step, this video shows the constant improvement of a LEGO car so that it can cross a wider & wider gap between tables (4:24 minutes).
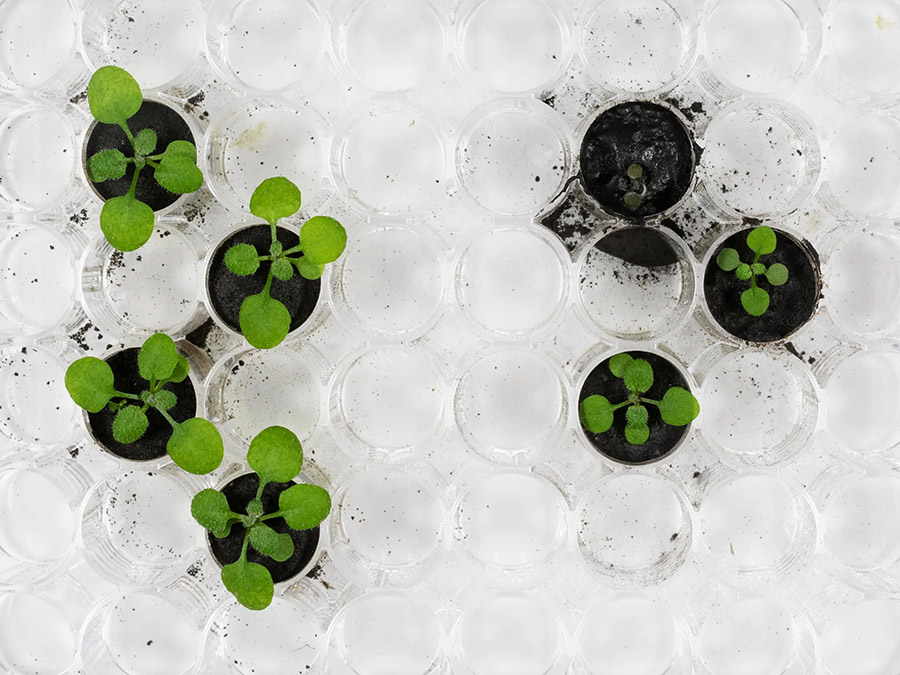
Iterative proposals: growing plants in lunar soil
Iteration can be about your proposals as well. This video covers how two UF/IFAS researchers iteratively designed proposals that eventually convinced NASA to loan samples of the moon’s surface to research if plants could grow in lunar soil (3:19 seconds)
Mission 8 – Communicate
What is “Communicate”?
This stage of the iSTEM engineering design process requires students to unveil their solution. How will they best communicate the functions of the solution? In which medium will the communication take place? What are the key messages?
Key Questions for Students to consider
- Have all key stakeholders been informed throughout?
- Who needs to see the solution(s)?
- How can you best share or pitch the solution?
- What enterprise and entrepreneurial skills are required to successfully market the solution?
- What are the results of product and market testing?
- Would the solution benefit a broader market? How could you reach this market
Possible Activities
- Document all aspects of the engineering design process.
- Pitch the solution.
- Communicate evidence-based results to justify design decisions.
- Communicate to key stakeholders using presentations, reports, and drawings.
- Develop a communications and marketing plan
Suggested Learning Sequence – Communicate
Our expert curriculum designers have developed a suggested Mission 9 learning sequence for teachers. The following is for the full set of AVA resources; however, teachers are encouraged to only use activities that are most suitable for their own class and school setting.
Sub Mission 1: Setting the Scene Watch the introductory video for Mission 9.
Sub Mission 2: Communication and Collaboration Watch Communication and the ‘Challenge of Collaboration‘ video by Carey Furze.
Sub Mission 3: Communicate Provide students with this worksheet and get them to produce a final dimensioned orthogonal drawing. Students may wish to watch video tutorials from Glenny D.
Sub Mission 4: Pitching Provide students with ‘Pitching your Solution’ worksheets. Get students to watch ‘Pitching with Dr Scott Sleap‘ video. Using the second worksheet, get students to storyboard a pitch deck for their 90-second presentation.
Sub Mission 5: Communication – Instagram Provide students with this worksheet and discuss.
Sub Mission 6: Communication – Podcasting Provide students with this worksheet and discuss.
Sub Mission 7: The Future, Space Taco’s and Artemis Watch an inspirational video about the future, space taco’s and the Artemis program presented by Lori Waters and Ted Tagami from Magnitude.io.
Communicate – Downloadable Resources
– Where We Live

Communication
In this worksheet students learn about communication and produce a final concept drawing.

Communication – Pitching
In this worksheet, students learn about pitching their concepts and making a pitch deck.
Communication – Instagram
In this worksheet students learn how to create and the tools required to create Instagram videos.

Communication – Podcast
In this worksheet, students learn how to create and the tools required to create a podcast.
Communicate – Video Resources
– Where We Live
General background information for teachers and students to support challenge activities.
Storytelling with Data
In this informative video, Scott Berinato (Harvard Business Review) takes you through how to create a story out of your data that compels audiences. 3 steps; Setup, conflict, resolution. (4:46 minutes)
Communication and the Challenge of Collaboration
How to communicate & collaborate across your team is an essential question that faces all organisations. Cary Furze from eBookform discusses how to be effective in a team when collaborating and in presenting your messages for audiences (4:46 minutes).
Pitching with Dr Scott Sleap
Just how do your fro coherent messages when you are forming a pitch? What are the essential ingredients? Does language, tone and posture matter? Dr Scott Sleap from STEM Industry School Partnerships discusses best practices in pitching concepts to a variety of audiences (4:46 minutes).